Upcycling an Old Server Computer Into:
A Desktop Super-PC
64bit, 8x 2.33GHz Processors, 24GB RAM, 2x Gigabit Ethernet, 4x SAS/SATA, 1x PCIE slot
With the cost of a half decent PC (eg; for gaming, video editing, or 3D CAD) being really high, one solution is to use a second hand server computer as they generally have quite a high spec, and can be picked up cheaply.
So, this is a rambling account of how I built a high spec desktop PC at a fraction of the cost!
Almost every single part of this machine has been re-used from another old computer.
(I was at first uneasy about using the term "upcycling" as it seems to have become a trendy thing to be seen to be doing with old household junk in order to get some social media attention, but when you look at the actual definition of the term, it does fit this re-use project better than "recycling".)
Rough comparison of rack-mount and tower forms
Generally a rack mount server is designed to operate in a nice, cool, air-conditioned server room. This cool air means that the fans and processor heatsinks can be smaller, resulting in slim cases. Due to this, I have found that slim Rack Mount servers can struggle in warmer (household) environments.
Rack-Mount servers also have VERY noisy fans. As a server room is not intended to be an office space, fan noise is not a priority to manufacturers. If you've ever seen a Hollywood movie which has scenes set in a nice quiet server room, where people can hear each other talking - it is probably complete and utter tosh!
Some server computers are available in Tower form, like the HP Proliant. Using a Tower server would be a good way to start a similar project; as case size is less of an issue, allowing for bigger (and slightly quieter) fans and nice big processor heatsinks. Tower servers are pretty much good-to-go as a PC from the outset as they require little to no modifications (possibly just silent fans), but will be more expensive to buy second hand than a rack-mount equivalent machine, probably because they are more desirable for home / small office use.
My project
The donor server
This server was always a bit of an oddball. A DELL CS24-SC, where the CS stands for Custom Server... as a result there's no manual or information available for it. There are rumours online that they were built for Facebook (perish the thought!), but not much in the way of good information exists.

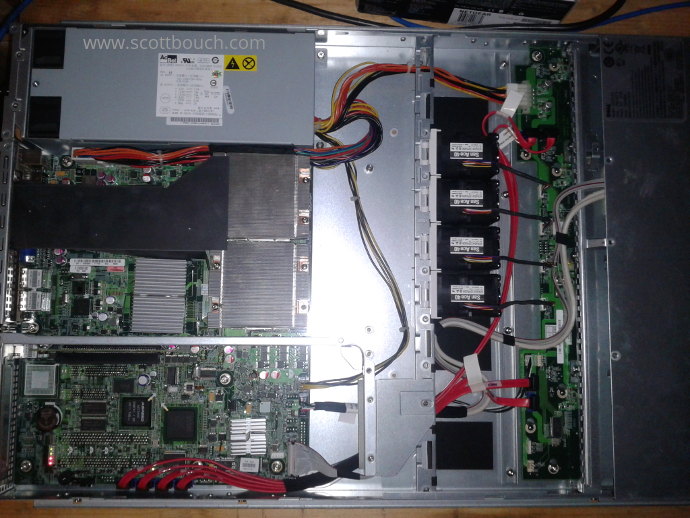
Oddball aside, it always was a fairly good machine - with two quad core Intel Xeon e5410 slanw 2.33 GHz processors and 6GB RAM, it never struggled.
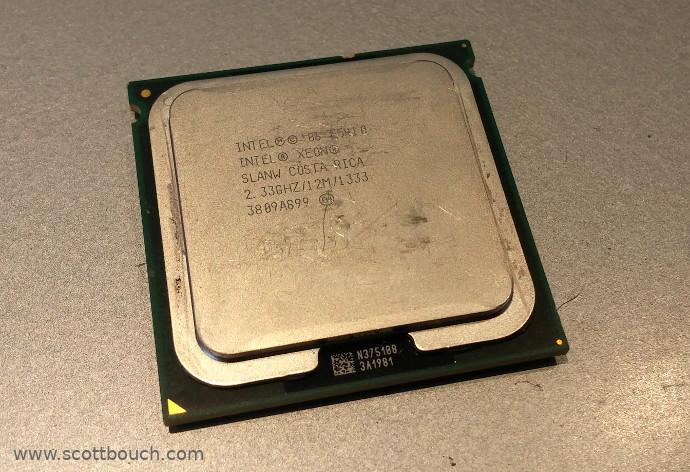
It originally cost just £90 second hand from ebay (with no drives). I had been using it for a couple of years for ZoneMinder CCTV recording, PLEX media server, Mumble VOIP server etc...
It had issues when operated at home in normal household temperature conditions, especially in the height of summer on hot days. Being a slim 1U high 19" rack mount server means tiny heatsinks on it's two quad core processors, and a row of tiny and VERY noisy fans. I don't have an air conditioned room for it, so on warm days the processor core temperatures would get up to 90 to 100°C. In the summer of 2017, it burnt a processor out on the hottest day, but luckily due to its age a spare second hand processor cost just £5.00. After this event, I replaced this DELL CS24-SC with an HP Proliant 2U high server, which had heatsinks double the size, and as a result, the processor core temperatures are around 50 to 60°C. This is when the old CS24-SC became available for this desktop PC project.
The CS24-SC's other limitation was that its on-board RAID controller could only support hard drives up to 2TB per bay (4 bays = 8TB max), this limits its use as a file / media server, but has ample storage capability for a desktop PC.
Shoe-horning it into a regular case
I had an old Akasa tower case sitting under my garage workbench just gathering dust... it was capable of taking a full ATX main board, and as the CS24-SC board is quite big, I got the tape measure out to see if it would fit.
It turns out that server main boards don't quite conform to the regular ATX standards regarding processor mounting hole positions and rear panel size.
To mount the processor heatsinks, I had to drill and tap the mainboard chassis plate for 8 holes. The rest of the screw holes lined up nicely.
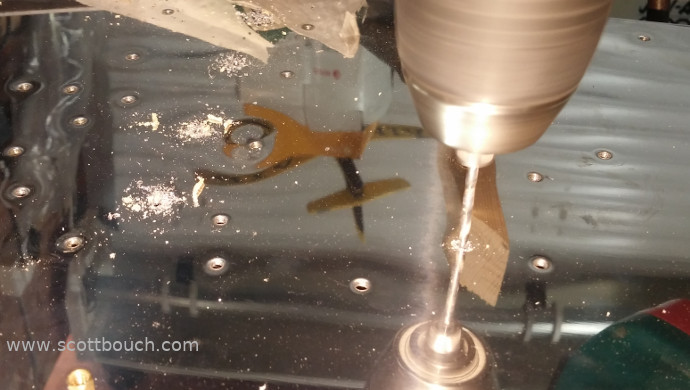
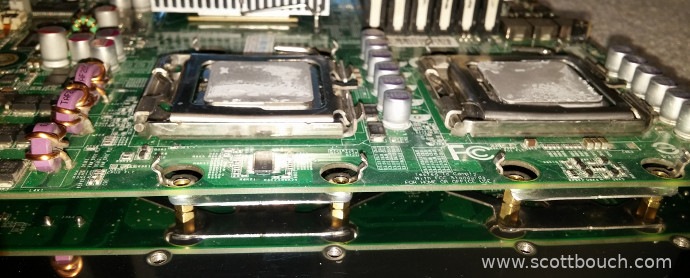
The rear panel that surrounds the connectors also needed cutting down in length to fit the smaller standard ATX sized hole in the PC case.
Power supply
As the original CS24-SC (much like most rack mount servers) uses caddy slots to insert HDD's in from the front panel, this requires an extra interface PCB to present the caddies with fixed connectors for power and SATA. A regular PC uses flying leads for HDD power and SATA, so this board wasn’t used in the PC build. This board also powered the original fans.

The PC build required regular flying leads for drive power, so I was faced with a choice of installing a regular ATX PSU, or modifying the original DELL one from the CS24-SC. I had a couple of spare ATX PSU's, but none had the right connectors for the CS24-SC main board, so I decided to modify the original PSU.
The modification included cutting off the original 8-way connector that used to plug onto the HDD PCB, and splicing on normal HDD power flying leads cut off a regular ATX PSU. There's many ways to skin a cat, but I opted for soldering and applying heat-shrink sleeving.
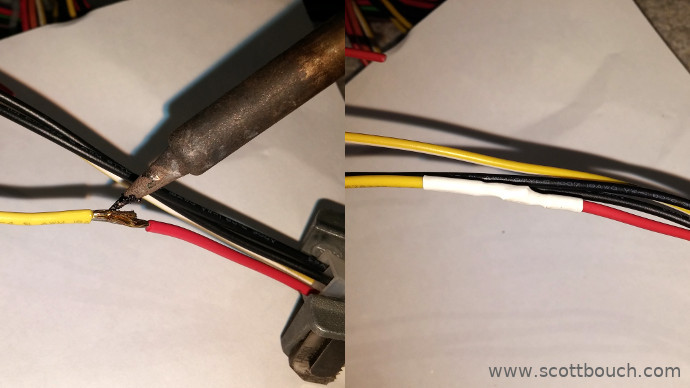
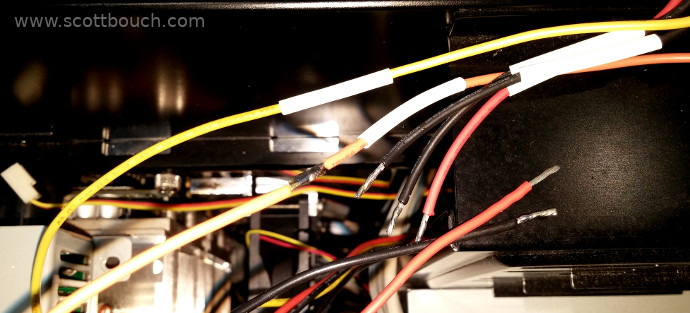
Mechanically, the 1U high PSU is a completely different shape and size to a regular ATX PSU, so some metalwork was required to make it fit.
Being small (to fit in a 1U high enclosure), its fans make a horrible whining noise, so in with the metalwork, provision was made to use a bigger, silent fan and remove the original pair.
PCIE slot
This modification is not for the faint-hearted!
The CS24-SC uses a riser board to allow a PCIE card to be installed flat / laid down. For this regular tower PC case, the PCI card needed to be perpendicular to the main board, ie: ditch the riser.
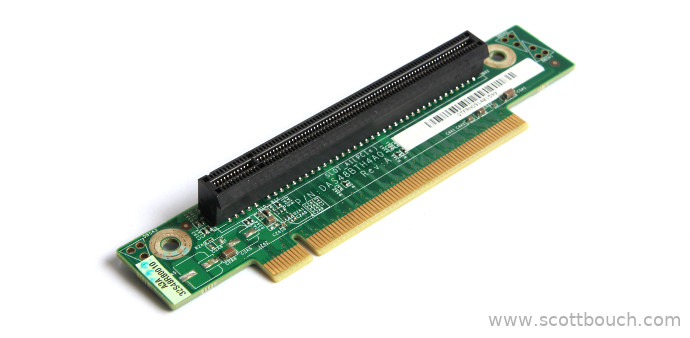
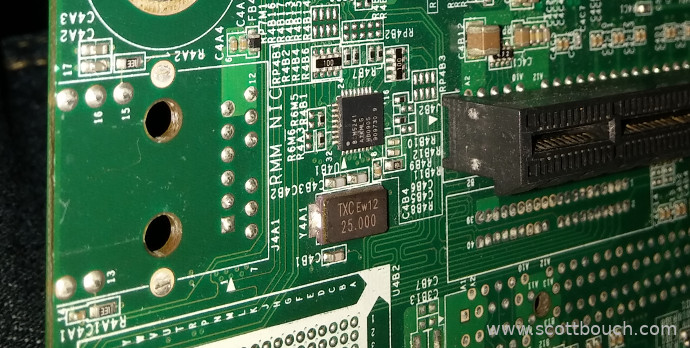
Getting rid of the riser and plugging a PCI card straight into the main board was NOT as simple as it sounds... as a regular PCIE board clashed with the 10/100 Diagnostic Ethernet port, and an electrolytic capacitor.
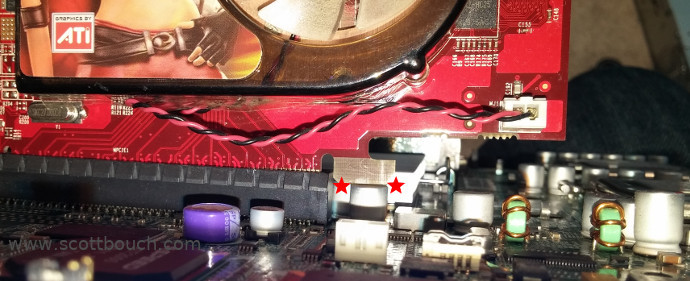
Solution: get rid of the 10/100 Ethernet port as I never used it anyway; and re-locate the capacitor out of the way.
Removing the Ethernet socket was easy, I carefully minced it to bits using some wire cutters, taking care not to damage the main board.
The capacitor was very hard to de-solder as it was soldered to some pretty hefty tracks (high current), so getting enough heat in to the joints was hard, but I got there eventually. I extended the capacitor's legs using some insulated wire, used heat-shrink sleeving over the joints, and, once located, soldered the other ends to the main board.
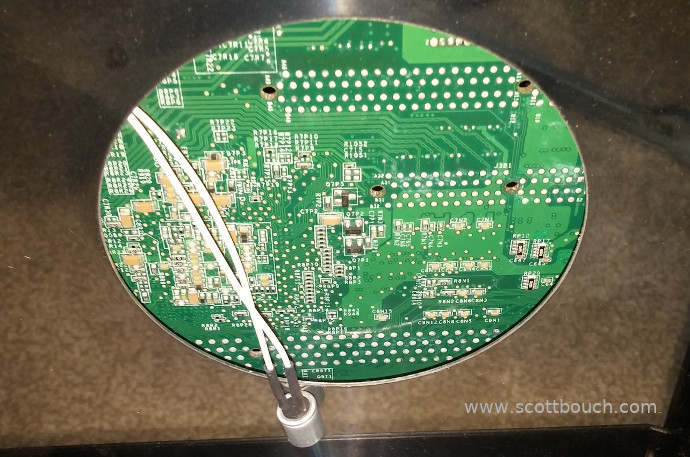
It is hugely important to get the polarity right, as electrolytics can blow up if the polarity is reversed!
The image below shows the removed capacitor allowing space for the card.
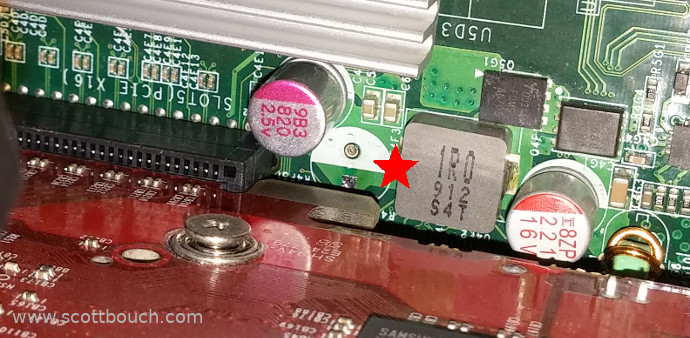
The PCI-Express slot conforms to Revision 2, and is capable of X16 cards, the slot is "Slot 5" of the mainboard even though it's the only PCI socket fitted. lspci info below:
- PCIE slot limitation
By far the most notable limitation of this machine is just having a single PCI slot. I am just intending on using one graphics card, so no big deal, but anyone wanting more than 1 card will have to carefully choose their donor server.
Graphics card
This has to be the most astounding part of putting this project together!
I had mentioned to the folk on the FGUK forum that the graphics card I was using was rubbish.
It was an old 265mb graphics card I found knocking around in the garage, which being an upcycling project, fitted with the ethics, but was pretty useless for Flightgear and Blender, plus regularly would give me black screens.
Upon hearing my woes, one of the chaps on the forum, "VooDoo" in the USA, offered to send me his old card, for free - he wouldn't even accept (international) postage payment! He was just happy to see it being used again! It's little things like this that restore your faith in humanity, the world does contain some nice people!
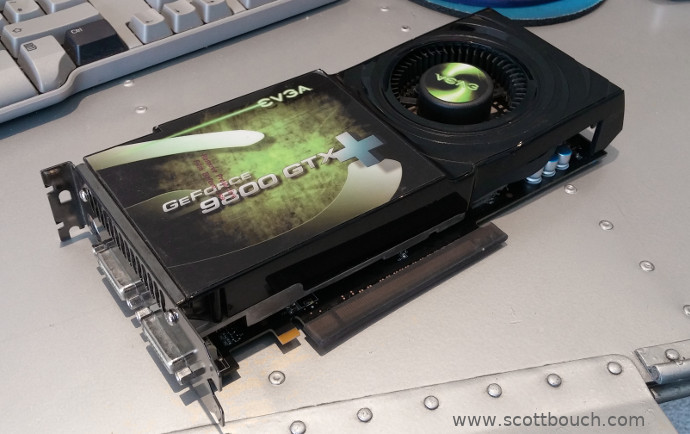
The card is an EVGA GeForce 9800 GTX+, with 1Gb of video memory, so, memory alone, is a 4x improvement on my previous card!
Processor heatsink upgrade
As I now had the mainboard in a bigger case, I dispensed of the original 1U high heatsinks, and found some 2U high ones. To be fair, I could have fitted much taller ones in the case, but these were sufficient to drop the processor core temperatures.
These heatsinks, and the fans below, are the ONLY new parts bought and fitted as part of this project.
Fans
To direct air at new heatsinks of the processors, I mounted a 90mm silent fan on the mainboard mounting plate using some aluminium angle section I had left over from a house roofing repair job.
While I was having the original processor temperature issues with the CS24-SC, I also found that the original RAM sticks (6 x 1GB each) were also getting rather too hot for my liking. So, to avoid this occurring again, I made another aluminium bracket and positioned another fan directly over the RAM sticks.
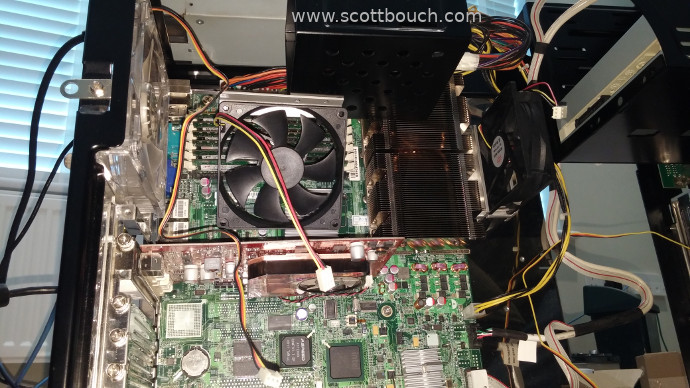
As I was not going to be using the SAS / SATA drive interface board which previously provided power to the original fans, I had to think of a new way to power the fans. So, I used a small strip of Vero-board, soldered to it some KK-Series 3-way headers, and a flying lead to connect to a spare hard drive cable, to the 12V power.
Front USB sockets, power button, LEDs
Unfortunately there is a little PCB right at the front of the CS24-SC for the USB sockets and power button.
Why do I say unfortunately? Well, it's not a simple beast. It doesn't just pass discrete signals directly to the LEDs and receive from the power button
I'd have liked to wire the case's power button and LEDs directly to the mainboard header (as you would for a normal PC), but the existence of this little complex board means I think it must remain in use... So, for now (until I figure out a better way) I just mounted the board poking through a spare CD drive slot, so I can use the original CS24-SC power button and USB sockets through a CD slot.
Audio
As there is generally no need for speakers / mic etc with a commercial server computer, there is no on-board sound hardware. So, I resolved this by using a Creative Labs Sound Blaster X-Fi Go! USB sound card, bought from ebay second hand for about £12.00.
Drives
I installed two second-hand SSD's taken from a dead laptop, and another computer build project.
Using an SSD over an HDD will help squeeze another drop of performance out of it! But of the two drives, I used the slower Toshiba one for OS and software, the faster Samsung one for data.
This old PC tower case also had some non-descript DVD writer drive already installed, so that got re-used too.
RAM upgrade
This CS24-SC machine came with 6Gb RAM, but can take up to 24Gb. Luckily this type of RAM (DDR2 PC2-5300) is at an age where it's cheap to pick up second hand. I found some on ebay, and for less than £1/Gb I installed the full / crazy 24Gb of RAM!
OS Choice
Being a big fan of Linux, I was only ever going to install a Linux flavour, plus being free, it fits with the cheap computer concept!
I fancied trying something new on this build. I'd always used Debian branches: Ubuntu, Linux Mint and Raspbian; but this time opted for a totally different flavour, an Arch derivative, Manjaro, simply because it's what all the cool kids seem to use!
Results
Processor Performance
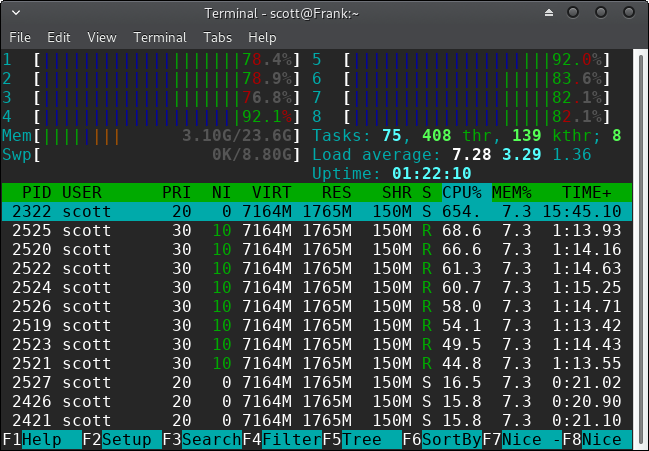
Benefits of the 8x processors can really be seen with certain programs designed to utilise multiple cores. A good example is processing 1080p videos using OpenShot. A quick peek at processor utilisation using the 'htop' command shows that OpenShot makes good use of all 8 cores, each utilised between 75% and 95%.
Processor Temperatures
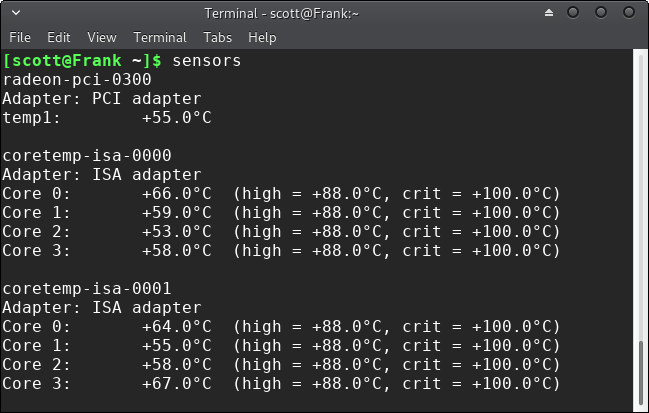
Recalling the original issue of the 1U high server, the processors were burning out on hot days by running in excess of 100°C. Now with the 2U high heatsinks, and dedicated fan, the temperatures are a much more reasonable 50°C to 70°C.
Memory
With so much RAM (24GB) I'm yet to come across a program that uses much of it at all!
One thing I can say though is that my Swap Memory has remained completely untouched!
Networking
The Gigabit Ethernet connection has been a real dream to use. Accessing my NAS and new server which are also Gigabit Ethernet capable (as is my POE switch, and Cat-6 network cable), is just like using an internal SATA drive! You wouldn't know you were accessing network resources, it's lightning fast!
The image below is a screen-shot of a little desktop utility in Manjaro called "Network Monitor". It shows the speed of me transferring a large file from this PC to my server. Both are connected to my Gigabit speed switch by CAT6 Ethernet cable. This PC has an SSD, the server uses a RAID 5 array of Western Digital Red drives, and results in file transfer speeds witnessed going over 900 Mb/s, nearly a Gigabit!

Having the second Ethernet port has also been handy at times when needing to connect to a device with a fixed IP address on a different IP range to my home network; such as configuring a wireless access point. I am considering placing my CCTV IP cameras on a different IP range to my router for added security, so this port will be useful then to allow access to both IP ranges simultaneously.
Graphics
My weedy graphics card that I found in the garage was not only pretty useless for demanding applications, but is also failed quite often leaving me with a black screen or two.
But, the EVGA GeForce 9800 GTX+ kindly donated has completely transfofmed the user experience! It is amazing now! FGFS frame rate is now around 30 FPS when spanning across two monitors.
Sound
My £12.00 second hand Sound Blaster USB sound card has been fantastic. I plan on installing a USB hub inside the computer case, mounting this sound card within, and installing sockets to the front panel.
Conclusion
Overall I'm really very happy with it. It's in use every day, sometimes for special purposes where it really comes into it's own, but also for mundane day-to-day PC use.
It's been a worthwhile project, and I've ended up with a super computer for a fraction of the retail price of a similar beast!
Thanks
Many thanks go to VooDoo from the FGUK Forum for kindly donating the graphics card.